
January 22nd 2025 - Abhijata Inversions
- Tamara Hockey
- Jan 22, 2025
- 6 min read
Updated: Jan 23, 2025

Another great class with Abhi this morning, this time almost entirely spent in inversions. Towards the end we did a very long Sarvangasana with a rolled sticky mat under the elbows. This combined with less height than I am used to, produced a very pronounced Jalandhara Bandha action with my chin buried in my chest and my back flying up towards the ceiling which seemed to switch mental activity off almost completely, so that when we rolled down into Paschimottanasana I felt absolutley quiet and was disappointed there wasn't time to stay for a much longer duration.
During the class she encouraged us to be much more internally aware and responsive.
Guruji said “You people seek – I see!"
You can’t have a tick list! If you are looking with a particular expectation, how many other things will you miss? Just do your own pose and then the body itself will send you a notification, not the brain! And whatever notification you receive, that is the point that you will observe and use as the focus for your actions.
In the afternoon I did a Zoom interview about the blog with the German Iyengar Yoga Association and in the evening popped out for a dosa with Debbie and Rosana. This time next week, I will be at the airport waiting for my flight home, so I fully intend to appreciate every remaining minute I have here before I return to the madness of daily life.
Thanks to Rosana for help remembering the class - it looks as though there won't be anyone observing the classes for the remainder of the month, so it'll all be down to memory.
January 22nd 2025 – Abhijata Inversions
AMVirasana folded elbows to rest the head and quieten the brain for the prayers.
Swastikasana head, brain, throat passive for the chanting. Those that did not do AMVirasana (online batch who had no audio) you have to bring the ‘Adho Mukha Virasana-ness’ to your pose.
In the following poses, I don’t want you to ‘push’ the body into the pose but take the body. Understand it’s a different proposition.
AMSvanasana – Don’t force the head down, Take the head down.
Uttanasana
Prasarita Paddottanasana – You will be here for 2 minutes quietly. Head supported if needed.
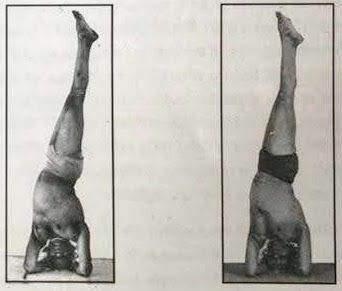
Sirsasana 1st attempt
Eka Pada Sirsasana 1st attempt. Then we came down for dialogue.
Eka Pada Sirsasana – Observe in your own pose what gets disturbed when you go to Eka Pada Sirsasana. You people SEEK and therefore you don’t SEE. So much is missed! Guruji said “You people seek – I see”. You can’t have a tick list! Just do your own pose and then the body itself will send you a notification, not the brain! And whatever notification you receive, that is the point that you will observe and correct. In my case I noticed that the organs were hitting the skin at the front of the body, so I kept them back as I took the leg down. Other people noticed that the top leg was coming forwards, or the shoulder was getting disturbed.
Here we looked at different methods of Eka Pada Sirsasana 1) Belt tied between the two top rope rings, tight to secure the front ankle 2) Belt tied around the pillar to secure the front thigh 3) Looser belt at the grille around the front ankle to enable more movement initially – if you hold a beginner back too much they will never know what range of movement is possible 4) Heavy stool with a weight on top so that the eka pada heel is fixed and student can work on filling out the back of the thigh and knee. Otherwise when you see that dip in the outer back thigh, that means that hip is going to fail and drop down. ‘Heel push! And outer thigh LIFT!
Parsva Eka Pada Sirsasana – Observing your own body’s ‘notifications’ and adjusting accordingly – not jumping here there and everywhere with a tick list but noticing one place that was failing and fixing the awareness there to keep that action as the leg descended.
Parsva Sirsasana
Parsva Sirsasana at wall - Instead of just turning the feet and legs, the turn has to come from the source, which is the hips. Let the right hip be on the wall and turn the hips until the left hip come in front of the right hip.
We looked at the evolution of Parsva Sirasana from Light on Yoga to The Art of Yoga. You can’t say that Guruji’s pose is better in Art of Yoga so I will do that! It is an evolution so first the grip of the hips and contraction of the buttocks that is shown in LOY must be learnt and later Art of Yoga Parsva Sirsasana may come.
We also observed that one shoulder was dropped – he didn’t insist that shoulder stayed lifted at the expense of getting a full rotation. As a teacher I may insist that both shoulders stay lifted to protect everybodys’ neck, but as practitioners you may feel confident if your neck is okay to allow that shoulder to drop a little and see what rotation is possible.
Multiple attempts at Parivrtta Eka Pada Sirsasana, including:
Parivrtta Eka Pada Sirsasana at wall – from Parsva, split the legs.
Parivrtta Eka Pada Sirsasana in centre.
Here she mentioned that by restricting the front leg as we know it tends to go down ‘too much’ in comparison with the back leg, we concentrate only on that one aspect, but we lose so much in having the freedom to fully stretch, extend through the legs. Letting this go a little was really freeing to experience the freedom of the leg extension.
She spoke at length about be able to help people with hands on adjustments in the pose. If your child is afraid, talking to them won’t remove the fear but the moment you seat them on your knee or hold their hand, the comfort is going to come and the fear will be removed. Additionally, it is only by direct perception, by giving your students an experience of how the pose should feel that they will understand (like eating real Indian food in India compared to what is served back home! Or vice versa the pasta that you eat in India versus the pasta in Italy, only once you have tried you will know!). She showed supporting Uday in Parivrtta Eka Pada Sirsasana standing behind him, holding his thighs from underneath. ‘He is a sincere student! He fully believes he is doing!’ but when she supported his thighs he was able to fill out the hollows in the back of his knee and thigh and extend the leg as one complete unit. Once he has felt the correct action with a ‘hands on’ adjustment, then he knows the feeling he is looking for when he is working independently. This cannot be taught with verbal instruction alone.
Urdhva Dhanuarasana or Ustrasana if desired to recover.
Paschimottanasana
Uttanasana
Sarvangasana – Very long stay. Rolled sticky mat under the elbows and find out what is the lift of the chest. It is called shoulder stand, not shoulder blade stand! So lift the back up and roll the shoulders such that you are on the very blade at the top of the shoulder. Break (not compulsory) in Halasana to recover and re-energise the Sarvangasana.
Sarvangasana is known as the ‘Mother of all asanas’ so let it have the quality of mother. What are the qualities of a Mother? Kindness but firm where they need to be, calming, caring, They give a supporting, stabilising force. Can you cultivate those qualities in your Sarvangasana?
Paschimottanasana (I took the roll that had been under my elbows and put it on my shins to support the forehead. Quietest Paschimottanasana ever.
Uttanasana
Viparita Karani – Unique pose because it is an inversion but the abdomen is a plateau. In Dwi Pada Viparita Dandasana or Setubandha Sarvangasana the abdomen is a plateau but there is no inversion. In Sirsasana / Sarvangasana body is inverted but body is on one plane. Various breath techniques were explored to enhance the actions in the pose: Use the inhalation to coil the chest and exhalation to descend the heels. In Viparita Karani the abdomen a plateau and the breath flowing over the rib cage down into the chest like a waterfall. Inhaling to draw the inner thighs and groins downwards and observing the effect that had on the chest
The set up method really enhanced the abdominal plateau. We put a three-fold blanket or similar just uner the front edge of the bolster, such that it created a tilt where the bolster slightly angled down towards the wall. We needed more than the height of a single bolster, so most people either had two bolsters or a bolster and a pranayama pillow. There was a brick between the bolster and the wall to keep the gap and for the buttocks to stretch down to. In addition to the 3-fold blanket, there was a flat blanket that would be under the torso, so that it was softer on the head when you rolled into the pose - you can go in sideways as most of us were taught as beginners, but if your neck is okay, rolling in gives a superior pose. For those who have not done this, you place your head on the blanket with the back of your head towards the bolster side and forward roll. Your legs will hit the wall and then you slither down - Abhi said the wall is like a 'leech' as the legs do seem to cling to the wall a little as you slide down into a Viparita Karani.


Comments